ShopDreamUp AI ArtDreamUp

Deviation Actions


Description
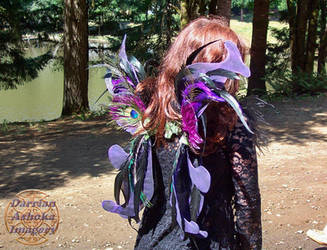
the back view of my Akuma Homura demon wings
front view:
deanna-lee.deviantart.com/art/…
more WIP shots:
deanna-lee.deviantart.com/art/…
deanna-lee.deviantart.com/art/…
finished (gallery):
deanna-lee.deviantart.com/gall…
***THIS TUTORIAL IS ALMOST FINISHED, BUT I'M STILL WRITING SOME DETAILS ON THE HARNESS. i'm actively working on this tutorial every day until it's finished - THANKS FOR YOUR UNDERSTANDING IN THE MEANTIME~ orz
before i start describing this process, i want to stress how important it is to choose lightweight materials when making any wings, especially wings to be worn for several hours or more at a convention! this was especially important for this cosplay because the harness HAS to be very small in order to be invisible under that skimpy devil dress ♢ ♚
♚
keeping that in mind, i purposely chose super lightweight (& cheap!) materials:
*copper tube - approx 5ft tall, approx 1/2 inch thick (approx $9 at hardware store)
*1 thick foam core sheet (approx $1 per sheet at craft store)
*black stretch velvet fabric - i used scraps from making Homura's demon dress, so i don't know the amount
*white downy faux-fur fabric - approx 1 yd
*nude stretch fabric
*black feathers - 30 large, 10 small, all hand shaped (i got mine for approx $4/dozen or so? at craft store)
*craft wire, heavy gauge - approx 10-12 ft?
*1 wire hanger, bent into a Y
*duct tape
*glue gun & hot glue sticks
*needle, black thread, white thread
i'll start with building the wings, because you need to know how much your wings weigh before making the harness.
>first i'll break down the black "arm":
i used copper tubing from the hardware store, about 5 feet long & 1/2 inch thick - i don't remember the exact dimensions, but i DO remember it cost me about $9 at home depot. it's important to get copper, because it's soft & very easy to bend. while it's also easy to un-bend, the kinks are pretty much impossible to get out, so be careful about where you bend it, because it will crunch the tube a little each time.
first i bent the tube into almost a 90 degree angle at the middle. i found a big pointy rock, put the center of the length against the corner of the rock, & slowly pushed down on the ends of the tubing to bend it. wear work gloves for this, ones that have a good grip so your hands won't slip on the copper, but also thick enough to protect your fingers from getting bashed on rocks!
bending each wing into an arch is a little more difficult. i still used the rock, but the tube didn't bend right on the point where i wanted it to. (even though the copper bent right on the edge of the rock when i was bending the full length in half, the resistance changed when the length i was folding got shorter. i guess it might have to do with where i was holding the tube, i'm sure a more educated or science-minded person could solve this problem with a little engineering)
Homura's wings can arch more drastically than this, but i wanted big, fully expanded wings. so i didn't bend the arches very sharply. this is really up to your aesthetic preference, although i'll note that big open wings like these are very hard to get through doorways & crowds of people
i covered the copper tube in leftover black stretch velvet. sew a long skinny tube about 1/2 inch thick, stick the tube in, then sew up the end by hand. this needs to be tight & i used several glues to secure the fabric along the way, along the bottom of the tube, & especially at each end of the tube. i would suggest Fabri-Tac & hot glue for sure.
>white downy feathers:
i cut a foam core sheet into 2 "w" sort of shapes, which the white part of the wings appears to be. this will be the base for the white down, to secure the black feathers onto.
trace those 2 shapes onto the back of the white fabric, but add about 1/2 inch all the way around the edge. this is to make sure the fabric can cover the edges of the foam core.
cut 2 of each "w" shape, 4 total, to cover the front & back of each wing. you'll need to make sure you mirror 2 of them as they'll be the back side of the casing - if you don't mirror them, the fur will be on the INSIDE of the casing!
these will be hand sewn into a casing around the foam core AFTER attaching the feathers to the foam core.
>black feathers:
i used 20 large black feathers, 10 medium black feathers, but each wing ended up having 18 feathers (i counted Homura's feathers beforehand & usually found a range of 18-20 on each wing). shape each feather into points by hand.
knot the craft wire onto the ends of the spine each feather. clamp the knots tightly using jewelry pliers (other pliers or clamps should also work). this is to extend the spines, so we can secure the feathers to the foam core, without using up the length of the feathers, keeping them nice & long.
hot glue the wire knots along the bottom of the white foam core (don't worry, they will be covered with the white downy stuff later). i glued each wire vertically up along the foam core, hooking them back over the top of it, to make sure the feathers will not slide down & fall out while i'm wearing them.
Finally, hand sew the white casing around the foam core & wire - first along the sides & top, leaving the bottom for last. i glued the fabric onto the foam core & wires in front too, to secure the wire knots even more, before sewing up the bottom. sew between the feather spines, so the wire knots are hidden, & sealed in tight.
now you should have 2 funny looking black & white feather fans, & a big black "arm".
you can see in this photo, they're just safety-pinned on. i left them pinned during the entire process of making the harness. in fact, sewing the feathers to the arm was the FINAL step to making these wings, because i wanted to make sure the feathers fell directly downward instead of tilting to the front or back. the wings can tilt & the center of gravity can change once the harness is made, so to ensure that my feathers weren't skewed, i let them hang loosely until the very end of the process, then sewed them on tightly by hand when i knew everything was sitting properly.
>which brings us to the harness: ***it is highly recommended to use a dress form or mannequin for this step!!!
long story short, the harness is a Y shape that sits on my back, with a neckstrap at the top of the Y. the strap goes around my neck in front - like a backwards necklace. the base of the Y shape slides into a "sock" inside of the spine of my dress. the "sock" is in the black part of the spine of the dress, the top of the Y is covered in nude fabric & sits on my shoulderblades, usually also covered by the wig.
you can see it all put together here (deanna-lee.deviantart.com/art/… (gives me kind of a hunchback in that photo because i was leaning back, but oh well ><)
the most important thing is keeping everything lightweight & safe. the next most important thing, to me, is invisibility under the costume. because this dress has so many cutouts in the torso, strong corset-based harnesses are very obvious & won't look right. the PVC plate & pipe harness method also doesn't work without a strong base to secure it to. BUT, if your wings are heavy & need a stronger harness than the one i made here, your own safety is more important that screen accuracy!
ok so that's basically how the harness works
(more to come here about the specifics of making the harness)
here's a back view of the finished wings & harness when it's all put together with the dress:
deanna-lee.deviantart.com/art/…
another in-progress photo of the wings:
deanna-lee.deviantart.com/art/…
i hope this is helpful!
front view:
deanna-lee.deviantart.com/art/…
more WIP shots:
deanna-lee.deviantart.com/art/…
deanna-lee.deviantart.com/art/…
finished (gallery):
deanna-lee.deviantart.com/gall…
***THIS TUTORIAL IS ALMOST FINISHED, BUT I'M STILL WRITING SOME DETAILS ON THE HARNESS. i'm actively working on this tutorial every day until it's finished - THANKS FOR YOUR UNDERSTANDING IN THE MEANTIME~ orz
before i start describing this process, i want to stress how important it is to choose lightweight materials when making any wings, especially wings to be worn for several hours or more at a convention! this was especially important for this cosplay because the harness HAS to be very small in order to be invisible under that skimpy devil dress ♢
 ♚
♚ keeping that in mind, i purposely chose super lightweight (& cheap!) materials:
*copper tube - approx 5ft tall, approx 1/2 inch thick (approx $9 at hardware store)
*1 thick foam core sheet (approx $1 per sheet at craft store)
*black stretch velvet fabric - i used scraps from making Homura's demon dress, so i don't know the amount
*white downy faux-fur fabric - approx 1 yd
*nude stretch fabric
*black feathers - 30 large, 10 small, all hand shaped (i got mine for approx $4/dozen or so? at craft store)
*craft wire, heavy gauge - approx 10-12 ft?
*1 wire hanger, bent into a Y
*duct tape
*glue gun & hot glue sticks
*needle, black thread, white thread
i'll start with building the wings, because you need to know how much your wings weigh before making the harness.
>first i'll break down the black "arm":
i used copper tubing from the hardware store, about 5 feet long & 1/2 inch thick - i don't remember the exact dimensions, but i DO remember it cost me about $9 at home depot. it's important to get copper, because it's soft & very easy to bend. while it's also easy to un-bend, the kinks are pretty much impossible to get out, so be careful about where you bend it, because it will crunch the tube a little each time.
first i bent the tube into almost a 90 degree angle at the middle. i found a big pointy rock, put the center of the length against the corner of the rock, & slowly pushed down on the ends of the tubing to bend it. wear work gloves for this, ones that have a good grip so your hands won't slip on the copper, but also thick enough to protect your fingers from getting bashed on rocks!

bending each wing into an arch is a little more difficult. i still used the rock, but the tube didn't bend right on the point where i wanted it to. (even though the copper bent right on the edge of the rock when i was bending the full length in half, the resistance changed when the length i was folding got shorter. i guess it might have to do with where i was holding the tube, i'm sure a more educated or science-minded person could solve this problem with a little engineering)
Homura's wings can arch more drastically than this, but i wanted big, fully expanded wings. so i didn't bend the arches very sharply. this is really up to your aesthetic preference, although i'll note that big open wings like these are very hard to get through doorways & crowds of people

i covered the copper tube in leftover black stretch velvet. sew a long skinny tube about 1/2 inch thick, stick the tube in, then sew up the end by hand. this needs to be tight & i used several glues to secure the fabric along the way, along the bottom of the tube, & especially at each end of the tube. i would suggest Fabri-Tac & hot glue for sure.
>white downy feathers:
i cut a foam core sheet into 2 "w" sort of shapes, which the white part of the wings appears to be. this will be the base for the white down, to secure the black feathers onto.
trace those 2 shapes onto the back of the white fabric, but add about 1/2 inch all the way around the edge. this is to make sure the fabric can cover the edges of the foam core.
cut 2 of each "w" shape, 4 total, to cover the front & back of each wing. you'll need to make sure you mirror 2 of them as they'll be the back side of the casing - if you don't mirror them, the fur will be on the INSIDE of the casing!
these will be hand sewn into a casing around the foam core AFTER attaching the feathers to the foam core.
>black feathers:
i used 20 large black feathers, 10 medium black feathers, but each wing ended up having 18 feathers (i counted Homura's feathers beforehand & usually found a range of 18-20 on each wing). shape each feather into points by hand.
knot the craft wire onto the ends of the spine each feather. clamp the knots tightly using jewelry pliers (other pliers or clamps should also work). this is to extend the spines, so we can secure the feathers to the foam core, without using up the length of the feathers, keeping them nice & long.
hot glue the wire knots along the bottom of the white foam core (don't worry, they will be covered with the white downy stuff later). i glued each wire vertically up along the foam core, hooking them back over the top of it, to make sure the feathers will not slide down & fall out while i'm wearing them.
Finally, hand sew the white casing around the foam core & wire - first along the sides & top, leaving the bottom for last. i glued the fabric onto the foam core & wires in front too, to secure the wire knots even more, before sewing up the bottom. sew between the feather spines, so the wire knots are hidden, & sealed in tight.
now you should have 2 funny looking black & white feather fans, & a big black "arm".
you can see in this photo, they're just safety-pinned on. i left them pinned during the entire process of making the harness. in fact, sewing the feathers to the arm was the FINAL step to making these wings, because i wanted to make sure the feathers fell directly downward instead of tilting to the front or back. the wings can tilt & the center of gravity can change once the harness is made, so to ensure that my feathers weren't skewed, i let them hang loosely until the very end of the process, then sewed them on tightly by hand when i knew everything was sitting properly.
>which brings us to the harness: ***it is highly recommended to use a dress form or mannequin for this step!!!
long story short, the harness is a Y shape that sits on my back, with a neckstrap at the top of the Y. the strap goes around my neck in front - like a backwards necklace. the base of the Y shape slides into a "sock" inside of the spine of my dress. the "sock" is in the black part of the spine of the dress, the top of the Y is covered in nude fabric & sits on my shoulderblades, usually also covered by the wig.
you can see it all put together here (deanna-lee.deviantart.com/art/… (gives me kind of a hunchback in that photo because i was leaning back, but oh well ><)
the most important thing is keeping everything lightweight & safe. the next most important thing, to me, is invisibility under the costume. because this dress has so many cutouts in the torso, strong corset-based harnesses are very obvious & won't look right. the PVC plate & pipe harness method also doesn't work without a strong base to secure it to. BUT, if your wings are heavy & need a stronger harness than the one i made here, your own safety is more important that screen accuracy!
ok so that's basically how the harness works
(more to come here about the specifics of making the harness)
here's a back view of the finished wings & harness when it's all put together with the dress:
deanna-lee.deviantart.com/art/…
another in-progress photo of the wings:
deanna-lee.deviantart.com/art/…
i hope this is helpful!
Image size
960x720px 61.52 KB
© 2014 - 2024 Deanna-Lee
Comments12
Join the community to add your comment. Already a deviant? Log In
Do you have a link to where you have more specifics on the harness?